Showing posts with label comments. Show all posts

Saturday, September 1, 2012

2 CSS untuk thread Threaded Comments blogger

2 CSS untuk thread Threaded Comments blogger

1. demo pada gambar di atas dan di bawah untuk kode cssnya


.comment-content{white-space: pre-wrap;width: 95%;word-wrap: break-word;}
.comments .comments-content .comment {background: white;position: relative;border-radius: 0px 100px 120px;padding:5px;}
span.comment-actions, .continue {width:120px;background: #F1F1F1;border-radius: 20px 20px;text-align:center;font-weight:bold;text-decoration:none !important;}
span.comment-actions:hover, .continue:hover {background: #EBDDE2;text-decoration:none !important;}
.secondary-text{padding: 6px 12px 6px;text-decoration:none !important;}
.comments .comment .comment-actions a:hover{text-decoration:none !important;}
.comment-replies span div ol div li span {display:none !important;}
.comments .thread-toggle {background: #F3F3F3;border-radius: 20px;padding: 6px 12px 6px;font-weight: bold;}
.comments .thread-toggle:hover {background: #EBDDE2;}
.comments .comment-block {padding: 11px !important;margin-left: 48px;position: relative;left: 60px;background:#F1F1F1;border-radius: 10px;width: 400px;}
.comments .avatar-image-container img {overflow:visible !important;width:40px !important;}
.comments .avatar-image-container {width:40px !important;background: #F1F1F1;padding: 5px;border-radius: 100px;}
.avatar-image-container img,.avatar-image-container a img, .avatar-image-container {border-radius:20px;position:relative;height:40px;width:40px;background-clip:padding-box;}
.comments .avatar-image-container {max-height:50px !important;}
.comments .comments-content .comment-header {width: 450px;background:#F1F1F1;position: relative;left: -73px;}
.comments .comments-content .user {font-style: normal;font-weight: bold;position: relative;left: 80px;}
.comments .comments-content .datetime {position: absolute;left: 270px;}
.comment-thread ol div.continue {display:none !important;}

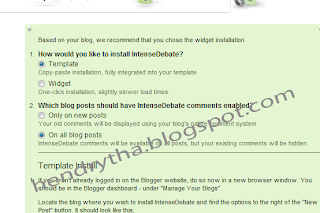
2. model  Threaded Comments yang kedua seperti gambar dibawah ini


kode CSSnya copy dibawah ini


.comment-content{white-space: pre-wrap;width: 95%;word-wrap: break-word;}
.comments .comments-content .comment {background: #F8F8F8;position: relative;border-radius: 0px 100px 120px;padding:5px;}
span.comment-actions, .continue {width:120px;background: #F1F1F1;border-radius: 20px 20px;text-align:center;font-weight:bold;text-decoration:none !important;}
span.comment-actions:hover, .continue:hover {background: #EBDDE2;text-decoration:none !important;}
.secondary-text{padding: 6px 12px 6px;text-decoration:none !important;}
.comments .comment .comment-actions a:hover{text-decoration:none !important;}
.comment-replies span div ol div li span {display:none !important;}
.comments .thread-toggle {background: #F3F3F3;border-radius: 20px;padding: 6px 12px 6px;font-weight: bold;}
.comments .thread-toggle:hover {background: #EBDDE2;}
.comments .comment-block {padding: 11px !important;}
.comments .avatar-image-container img {overflow:visible !important;width:40px !important;}
.comments .avatar-image-container {width:40px !important;background: white;padding: 5px;border-radius: 100px;}
.avatar-image-container img,.avatar-image-container a img, .avatar-image-container {border-radius:20px;position:relative;height:40px;width:40px;background-clip:padding-box;}
.comments .avatar-image-container {max-height:50px !important;}

moga bermanfaat

Saturday, January 14, 2012

cara mudah mengganti komentar dengan disqus

di tahun yang lalu saya pernah posting mengenai cara mengganti Komentar Blog dengan DisQus

dikarenakan untuk blogger yang mungkin untuk beberapa template tidak bisa langsung di generate pemasangannya lewat tool generator disqus jadi anda bisa menggunakan toutorial ini secara manual
tahapannya sama anda bisa lihat gambar: pertama tamaanda login ke akun disqus anda jika belum punya anda bisa lihat tahapan mendaftanya di sini
Selanjutnya setelah masuk acount disqus anda pilih menu SETING>>INSTALL>>BLOGGER


Selanjutnya akan tampil seperti gambar di bawah ini klik edit konten terlihat seperti yang dikotak merah


Ternyata kode widget disqus kosong dan kita harus memasukan kode tersebut dengan manual caranya lihat lagi gambar kembali ke akun disqus anda pilih menu Seting Install>>dan pilih >> universal code


anda perhatikan gambar yang berada di bawah ini yang di kotak warna merah yaitu nama short title yang akan anda gunakan untuk blog anda bila anda menggunakan untuk 1 blog berarti hanya ada 1.


Geser kebawah ada kode lagi Dan ada yang di kotak warna merah ada tulisan example anda ganti dengan kode yang ada pada kotak warna merah di atas. karena saya pilih untuk henrythaforum. jadi saya akan ganti EXAMPLE dengan hendrythaforum


kopi semua kode di atas dan ganti tulisan example sehingga akan menjadi seperti gambar di bawah ini
selanjutnya anda simpan

Tempatkan gadget tersebut di bawah postingan anda


hasilnya Seperti gambar di bawah


selamat mencoba


Friday, November 25, 2011

how to add recent comments in IntenseDebate


1. sign in to your account
Click extras
and widgets


2. select the gadget you want 


the red mark your url address


3. Select where you want to display the widget


last look at the results

Friday, November 18, 2011

How To Add IntenseDebate Comment to blogger

How To Add IntenseDebate Comment to blogger


I am posting this for the english version of my previous post it on my blog who speak Indonesian "senantiasa belajar"hendrytha.blogspot.com


IntenseDebate is one of the most popular a feature-rich comment system for WordPress, Blogger, Tumblr and many other blogging/CMS platforms.In this tutorial I am going to explain how to add IntenseDebate comment system to Blogger blog.

With IntenseDebate,you can do many things than your default comment system.These are some main features of IntenseDebate comments.

IntenseDebate features:

Comment Threading.
Reply-By-Email.
Email Notifications.
Commenter Profiles.
Moderation/Blacklisting.
Reputation Points & Comment Voting.
Plugins API.
OpenID.
Widgets.
Twitter Connect.
Facebook Connect.
RSS Readers & Tracking.

HTML Formatting

You can also customize your links and add some photos to your comments. IntenseDebate supports the following HTML tags: <a>, <b>, <i>, <u>, <em>, <p>, <blockquote>, <br>, <strong>, <strike>, <img>

Gravatar

Intensedebate offers full Gravatar support. If you have a Gravatar they will automatically upload your Gravatar when you signup for IntenseDebate. You can choose to use your Gravatar or upload a different profile pic.

Before start this process,you must backup your blogger template first.Save the backup template file on your hard drive.

1.Create a Account on IntenseDebate.com.


2. after that you log in. To install click the site and add your blog / site and you are prompted to enter your Url Address


3.NEXT STEP


you must take into
1.1.How would you like to install IntenseDebate?
if you want to install IntenseDebate?

select the "Template" option.
2.2.Which Should blog posts have comments enabled IntenseDebate?
Which blog posts must have comments enabled IntenseDebate?

Only on new posts
- Your old comments will be displayed using the original comment system of your blog

On all blog posts "
- IntenseDebate comments will be available on all posts, but comments that therewill be hidden.

Select "On all blog posts" "option.

Note: If you want to keep the "standard comments you post old Blogger blog", thenchoose "Only on the new entry".

4.Scroll down to the bottom of the instruction.
you are told to backup your template you get to design and select edit Teplate andDownload full template


after that you note where the downloaded file was saved because of this that we will upload the template


Now pay attention: now select the file where you save the template you downloaded and uploaded files


Next you Delete the existing code in your template


Copy the code in Diteintensedatabate earlier and copy the template that you Delete and save See the results

Just to the attention of utuk comentar your existing will not be displayed but are still in the database blogger
hopefully when the tide is many of the comments on your blog and your comments after this
especially if you do not understand please comment

How To Add Disqus Comment System to Blog


How To Add Disqus Comment System to Blogger

DISQUS is a comments platform that helps you build an active community from your website's audience. It has awesome features, powerful tools, and it's easy to install.Before this I have explain how to add IntenseDebate comment system to blogger blog and now I am going to explain how to add Disqus comment system to your blogger blog.
There are lot of good features with Disqus comment system when we comparing it with Blogger default comment system.
Realtime comment system
Comments become more like live discussions with realtime posting and updating. By offering a faster, more intuitive experience, Disqus is everyone's favorite way to comment.
Notification and reply system
The notification system lets people know when they've received a response. Best of all, they can continue the conversation straight from the email.
Inline media embedding
Full integration with media services such as Youtube, Flickr, and more. Attach media such as photos and videos right within the comments.
Mobile commenting
Fully compatible with mobile websites for commenting while on the go. The default mobile theme is formatted with smartphones, like the iPhone or Android phones, in mind.
Social integration
Full integration with Facebook, Twitter, and more. Let people login, comment, and share using social services they already use and love.
The Community Box
A quick way to show off what your community is made up of. The community box gives everyone a summary view of the activity and people participating on the site.
Liking and sharing
People can rate what they like by liking pages or comments and then sharing that on Facebook, Twitter, and other networks.
Moderation tools
Powerful and easy-to-use tools helps you keep your community under control. The moderation panel is designed for managing a large volume of incoming comments.
Spam-Be-Gone
Our in-house anti-spam technology keeps spam and unsavory people out of your community. Our anti-spam continually learns from the rest of the Disqus network to keep your site safe.
Mobile apps
Disqus apps are available for the iPhone, Android, and webOS phones. Manage your communities while you're on the go with these freely available apps.
Blacklists and whitelists
Make daily moderation easier with granular control over who gets to contribute within the community. Disqus gives you powerful tools such as blacklists, whitelists, and word filtering.
Import and export
Import existing comments into Disqus and sync up your data. All data is completely portable and can be exported at any time.
International languages
Disqus supports dozens of languages in addition to English. Complete your integration with native language support.
SEO-friendly and local sync
We offer plugins and integration methods that ensure compatibility with search engines.
Theme customization
Customize with CSS to smooth out the integration with your website. Or, use our advanced theme editor to craft your own custom theme.
Tweets and reactions
Disqus brings the conversation back to your site by collecting Tweets, mentions, and other reactions from around the web.
Profile management
Commenters control their personas and reputation across the different communities they participate on. Disqus makes it easy to track and keep conversations together.
Activity streams
Audiences stay engaged with insight into others' activity all over the web. Integrated activity streams let people see where else the smart people are talking.
Connected communities
Disqus reaches 200 million people every month across half a million websites and communities on the web. Keep the conversations lively by connecting your audience with the millions of others already on Disqus.
Before follow the instruction given below,
(a) Login to your Blogger Account.
(b) Backup your blogger template.
(c) Make sure that your blog is using Blogger Layouts. See upgrade instructions if not.
(d) Enable commenting. See instructions to enable commenting. Make sure that Who Can Comment? is set toAnyone.
Now Follow the steps given below. You can add Disqus comment system to your blog easily.
1. First create a account on Disqus.com.
2. Now visit this link to add your blog to the Disqus account:
http://disqus.com/admin/register/
3. Fill in the necessary details and click on "Continue".


3. Fill in the required details and click "Continue".


install platporm


after that Select addsite thereafter entered into your blog and add widgets OK completed


how to add Related posts in blogs


Related post or postings linked Extremely Useful for Your Blog Mainly SEO. Related heading to work when your post will be displayed under the posts related to these postings that refer the reader to read a lot more in your blog that makes visitors feel at home to read more of your posts. for this time I will share with you two pieces related to your post

Note: THIS different from the use of links within a link karenra Within a random post work and had nothing to do with the post concerned and the use of labels in every post you


2. RELATED POST V1

1.login to your blog account click on the draft and edit html
click Expand Widget Templates
find code: <data:post.body/> Note: use CTRL F to find the code themselves

Copy the code below just below the code <data:post.body/>

Note: If you are using auto readmore there are 4 or 3 code you put this code in the code below the third see in the picture below


CODE:


<b:if cond='data:blog.pageType == &quot;item&quot;'>
<br/>
<br/>
<H2>Read other articles:</H2>
<div class='cayunbox'>
<div style='margin:0; padding:10px;height:200px;overflow:auto;border:1px solid
#ccc;'>
<div id='albri'/>
<script type='text/javascript'>
var homeUrl3 = &quot;<data:blog.homepageUrl/>&quot;;
var maxNumberOfPostsPerLabel = 4;
var maxNumberOfLabels = 10;
maxNumberOfPostsPerLabel = 10;
maxNumberOfLabels = 3;
function listEntries10(json) {
var ul = document.createElement(&#39;ul&#39;);
var maxPosts = (json.feed.entry.length &lt;= maxNumberOfPostsPerLabel) ?
json.feed.entry.length : maxNumberOfPostsPerLabel;
for (var i = 0; i &lt; maxPosts; i++) {
var entry = json.feed.entry[i];
var alturl;
for (var k = 0; k &lt; entry.link.length; k++) {
if (entry.link[k].rel == &#39;alternate&#39;) {
alturl = entry.link[k].href;
break;
}
}
var li = document.createElement(&#39;li&#39;);
var a = document.createElement(&#39;a&#39;);
a.href = alturl;
if(a.href!=location.href) {
var txt = document.createTextNode(entry.title.$t);
a.appendChild(txt);
li.appendChild(a);
ul.appendChild(li);
}
}
for (var l = 0; l &lt; json.feed.link.length; l++) {
if (json.feed.link[l].rel == &#39;alternate&#39;) {
var raw = json.feed.link[l].href;
var label = raw.substr(homeUrl3.length+13);
var k;
for (k=0; k&lt;20; k++) label = label.replace(&quot;%20&quot;, &quot; &quot;);
var txt = document.createTextNode(label);
var h = document.createElement(&#39;b&#39;);
h.appendChild(txt);
var div1 = document.createElement(&#39;div&#39;);
div1.appendChild(h);
div1.appendChild(ul);
document.getElementById(&#39;albri&#39;).appendChild(div1);
}
}
}
function search10(query, label) {
var script = document.createElement(&#39;script&#39;);
script.setAttribute(&#39;src&#39;, query + &#39;feeds/posts/default/-/&#39;
+ label +
&#39;?alt=json-in-script&amp;callback=listEntries10&#39;);
script.setAttribute(&#39;type&#39;, &#39;text/javascript&#39;);
document.documentElement.firstChild.appendChild(script);
}
var labelArray = new Array();
var numLabel = 0;
<b:loop values='data:posts' var='post'>
<b:loop values='data:post.labels' var='label'>
textLabel = &quot;<data:label.name/>&quot;;
var test = 0;
for (var i = 0; i &lt; labelArray.length; i++)
if (labelArray[i] == textLabel) test = 1;
if (test == 0) {
labelArray.push(textLabel);
var maxLabels = (labelArray.length &lt;= maxNumberOfLabels) ?
labelArray.length : maxNumberOfLabels;
if (numLabel &lt; maxLabels) {
search10(homeUrl3, textLabel);
numLabel++;
}
}
</b:loop>
</b:loop>
</script>
</div>
<script type="text/javascript">RelPost();</script>
</div>
</b:if>


NOTE: Notice the red code "Read other articles" that you can change the name of desire


Next to setting CSSny but this depends on you want to wear or not here I do not pake Code CSS but I do not know for your template, you just input its CSS Code


now you find this code ]]></ b: skin> and you copy the code below the above code ]]></ b: skin>


. cayunbox {border: 1px solid # 000000; padding: 5px;

  background-color: # 7BFAAF;-moz-border-radius: 5px; margin: 5px;}

. cayunbox: hover {background-color: # CE44F0;}


then you save and see the result:


2. RELATED POST V2


1.login to your blog account click on the draft and edit html


click Expand Widget Templates


find this code: </ head> Note: use CTRL + F to search for code themselves


<script type="text/javascript">

//<![CDATA[

var relatedTitles = new Array();

var relatedTitlesNum = 0;

var relatedUrls = new Array();

function related_results_labels(json) {

for (var i = 0; i < json.feed.entry.length; i++) {

var entry = json.feed.entry[i];

relatedTitles[relatedTitlesNum] = entry.title.$t;

for (var k = 0; k < entry.link.length; k++) {

if (entry.link[k].rel == 'alternate') {

relatedUrls[relatedTitlesNum] = entry.link[k].href;

relatedTitlesNum++;

break;

}

}

}

}


function removeRelatedDuplicates() {

var tmp = new Array(0);

var tmp2 = new Array(0);

for(var i = 0; i < relatedUrls.length; i++) {

if(!contains(tmp, relatedUrls[i])) {

tmp.length += 1;

tmp[tmp.length - 1] = relatedUrls[i];

tmp2.length += 1;

tmp2[tmp2.length - 1] = relatedTitles[i];

}

}

relatedTitles = tmp2;

relatedUrls = tmp;

}


function contains(a, e) {

for(var j = 0; j < a.length; j++) if (a[j]==e) return true;

return false;

}


function printRelatedLabels() {

var r = Math.floor((relatedTitles.length - 1) * Math.random());

var i = 0;

document.write('<ul>');

while (i < relatedTitles.length && i < 20) {

document.write('<li><a href="' + relatedUrls[r] +
'">' + relatedTitles[r] + '</a></li>');

if (r < relatedTitles.length - 1) {

r++;

} else {

r = 0;

}

i++;

}


document.write('</ul>');

}

//]]>

</script>


2.Next you are looking for code <data:postLabelsLabel/>The full code like this:

<b:if cond='data:post.labels'> <data:postLabelsLabel/> <b:loop values='data:post.labels' var='label'> <a expr:href='data:label.url' rel='tag'><data:label.name/></a><b:if cond='data:label.isLast != "true"'>,</b:if> </b:loop> </b:if>


Next you delete the code and replace with the following code and save:


<b:if cond='data:post.labels'>

<data:postLabelsLabel/>

<b:loop values='data:post.labels' var='label'>

<a expr:href='data:label.url'
rel='tag'><data:label.name/></a><b:if cond='data:label.isLast
!= "true"'>,</b:if>

<b:if
cond='data:blog.pageType == "item"'>

<script
expr:src='"/feeds/posts/default/-/" + data:label.name +
"?alt=json-in-script&amp;callback=related_results_labels&amp;max-results=10"'
type='text/javascript'/>

</b:if>

</b:loop>

</b:if>


<p>

<h2>Baca
ini juga :</h2>

</p>


<script
type='text/javascript'>

removeRelatedDuplicates();

printRelatedLabels();

</script>


NOTE: actually you only need to add code that are red only easy but let me just change the code to 2 with a third code.

congratulations to try it when I hope this article helps to give me 1 or like facebook or join site and please your Commenting


How to Add a comment to the email on the blog


If you want to send visitors to your Email Or E mail your comment to this usually for personal messages such as this form of business can add to your blog and how:

Copy the following code:


<FORM action="mailto:you@yourdomain.com" method="post" enctype="text/plain"><TABLE BORDER="0" CELLSPACING="0" CELLPADDING="4" WIDTH="90%"><TR><TD width="30%"><DIV align="right"><B>Name:</B></DIV></TD><TD width="70%"><INPUT type="text" name="name" size="20"></TD></TR><TR><TD><DIV align="right"><B>Email:</B></DIV></TD><TD><INPUT type="text" name="email" size="20"></TD></TR><TR><TD><DIV align="right"><B>Comment:</B></DIV></TD><TD><TEXTAREA name="comment" cols="30" wrap="virtual" rows="4"></TEXTAREA></TD></TR><TR><TD>&nbsp;</TD><TD><INPUT type="submit" name="submit" value="Submit"><INPUT type="reset" name="reset" value="Reset"></TD></TR></TABLE></FORM>


Replace You@yourdomain.com with your email address

Add your view the first page or in your sidebar


Demo:

Name:
Email:
Comment:


create a form on the blog comment box

tips to make a comment Form Form Form depended comment will be comments from blogspot blog to more clearly be seen in the picture


only a few steps if my friend want to make a rich display comments gini note the following steps:


If you want to add contact forms like the one above to your blog you can get it from http://www.foxyform.com/.


1.


Isi Form anda Sesuai ke inginkan Create form dan copy Paste Code


END...!!!!!!!!!!!!!!!!!!!!!!


Thursday, November 17, 2011

How To Add Reply Option to Blogger Comments

How To Add Reply Option to Blogger Comments Using Image


1.Log in to your dashboard--> Desing- -> Edit HTML

2.Click on "Expand Widget Templates"

3.Scroll down to where you see this <data:commentPostedByMsg/> 

4.Copy below code and paste it just after above code.

<span><a expr:href='&quot;https://www.blogger.com/comment.g?blogID=YOUR-BLOG-ID&amp;postID=&quot; + data:post.id + &quot;&amp;isPopup=true&amp;postBody=%40%3C%61%20%68%72%65%66%3D%22%23&quot; + data:comment.anchorName + &quot;%22%3E&quot; + data:comment.author + &quot;%3C%2F%61%3E#form&quot;' onclick='javascript:window.open(this.href, &quot;bloggerPopup&quot;, &quot;toolbar=0,location=0,statusbar=1,menubar=0,scrollbars=yes,width=450,height=450&quot;); return false;'><img alt='Reply To This Comment' src='Your Reply Button Image Here'/></a></span>

NOTE : Replace YOUR-BLOG-ID with your blog ID.

Look at the example given below:

<span><a expr:href='&quot;https://www.blogger.com/comment.g?blogID=5653009345002937003&amp;postID=&quot; + data:post.id + &quot;&amp;isPopup=true&amp;postBody=%40%3C%61%20%68%72%65%66%3D%22%23&quot; + data:comment.anchorName + &quot;%22%3E&quot; + data:comment.author + &quot;%3C%2F%61%3E#form&quot;' onclick='javascript:window.open(this.href, &quot;bloggerPopup&quot;, &quot;toolbar=0,location=0,statusbar=1,menubar=0,scrollbars=yes,width=450,height=450&quot;); return false;'><img alt='Reply To This Comment' src='https://blogger.googleusercontent.com/img/b/R29vZ2xl/AVvXsEh3NAZ7mnB1X7K8gDrXMQlgn8p3PDfYgx6xIELUduqoygnIb687Y1Myt2zfjk0R7pAnjQvDJhP08gHsVuDq6yvZCotXGSzRzT2J7c_A_nMimp__5JaN1EWAc4x4W5qnPQk5mupYe0-ukIY/'/></a></span>

How To find your blog Id..

Login to your dashboard and click on "Settings" link of your blog

Now look at address bar of your browser.


Now Replace YOUR-BLOG-ID

Use this reply button images 


5.Save your template you are done.

How To Hidden Deleted Comments in Your Blogger


How To Hidden Deleted Comments in Your Blogger


1.Login to your blogger dashboard--> layout- -> Edit HTML

2.Click on "Expand Widget Templates".

3.Scroll down to where you see below code:

<b:loop values='data:post.comments' var='comment'>

<dt expr:class='&quot;comment-author &quot; + data:comment.authorClass' expr:id='data:comment.anchorName'>

<b:if cond='data:comment.favicon'>
<img expr:src='data:comment.favicon' height='16px' style='margin-bottom:-2px;' width='16px'/>
</b:if>

<a expr:name='data:comment.anchorName'/>

<b:if cond='data:blog.enabledCommentProfileImages'>
<data:comment.authorAvatarImage/>
</b:if>

<data:comment.author/>

<data:commentPostedByMsg/>
</dt>

<dd class='comment-body'>

<b:if cond='data:comment.isDeleted'>
<span class='deleted-comment'><data:comment.body/></span>
<b:else/>
<p><data:comment.body/></p>
</b:if>
</dd>

<dd class='comment-footer'>
<span class='comment-timestamp'>
<a expr:href='data:comment.url' title='comment permalink'>
<data:comment.timestamp/>
</a>
<b:include data='comment' name='commentDeleteIcon'/>
</span>
</dd>

</b:loop>

4.Copy below code and paste it just after <b:loop values='data:post.comments' var='comment'>.

<b:if cond='data:comment.isDeleted'>

<b:else/>


5.Copy below code and paste it just before </b:loop>.

</b:if>

6.Save your template, you are done.

"Email Me" html/javascript code for your blogs


Adding the "Email me" link to your blog/webpage is very helpful for the visitors who want to contact you.It increases the interactivity between the visitors and your site and make them come regularly.

Hi henry! I will write the email address directly like abc@gmail.com and ask visitors to contact me.So,why to add these clickable links like"Email me" ?
There are plenty of problems if you show your email address directly on your site as SPAMMERS find your email address easily via search engines,and other sources.
So,by adding this type of links will hide your email address and If your visitors want to contact you,they will click on it.If the visior want to sent to you via another source like yahoo,google,etc they will simply copy the email address(in the outlook express) and email you.
On clicking the links,WINDOWS OUTLOOK EXPRESS will be open by default.
So,how to add the "Email me" link?
There are two types of ways to do it.One is text link and another one is image link.

Text Link:
Suppose,your email id is abc@gmail.com ,here is the code you have to add

<a href="mailto:abc@gmail.com">Email me </a>


Don't forget to change the email address in the above code to your's.If you want another anchor text(not "Email me"),you can change it.
Image link:
Suppose,if you want the visitors to email you by clicking on an image like the below one


First you have to upload your picture to some image hosting services.They will give a direct link for the uploaded image.Take a note of it.
In this example, the direct link for the uploaded image is
http://i219.photobucket.com/albums/cc286/7kranthiswaroop/thenvelope.gif and your email address is some abc@gmail.com ,the code you have to add is

<a href="mailto:abc@gmail.com"><img src="http://i219.photobucket.com/albums/cc286/7kranthiswaroop/thenvelope.gif" alt="Email me" width="120" height="57" border="0" /></a>


Where to paste this code in your blogger(blogspot) blog?
Sign into your blogger dashboard>layout>add a page element>html/javascript and Paste the code and save the changes.
That's it!

Sunday, November 6, 2011

cara mengganti Komentar Blog dengan DisQus


setelah kemarain posting "cara pasang intensedebatedan sudah seperti saya katakan bila anda pasang intense databate komentar anda akan disembunyikan karena tidak adanya inport komentar cuman ada export doang....tapi jangan berkecil hati jika kawan blogger mau komentar yang pernah ada di bloger di tampilkan cuman caranya? Yang mau Baca ini Kali ini Saya ingin berbagi Informasi Seputar Blog untuk Memasang Form Komentar "DisQus Di Blog" anda. bila anda pasang Form ini Tentunya Akan tampak propesional lho hehehehehe semoga saja banyak orang yang mau berkomentar "di blog" anda Amin""" tapi jangan lupa juga komentar disini juga jangan cuma baca"""
form Komentar diskus ini Sebenarnya banyak manfaatnya terhubung dengan Seo lihat aja situs situs Dofollow pasti ada yang pakai Form ini lihat ni di bawah Fitur-nya:

Realtime sistem komentar 
Komentar menjadi lebih seperti diskusi hidup dengan postingan realtime dan update. Dengan menawarkan pengalaman yang lebih cepat, lebih intuitif, Disqus adalah cara favorit semua orang untuk berkomentar. 
Pemberitahuan dan sistem balasan 
Sistem pemberitahuan memungkinkan orang tahu ketika mereka telah menerima sebuah jawaban. Terbaik dari semua, mereka bisa melanjutkan percakapan langsung dari email. 
Inline Media embedding 
Integrasi penuh dengan layanan media seperti Youtube, Flickr, dan banyak lagi. Melampirkan media seperti foto dan video langsung dalam komentar. 
Handphone komentar 
Sepenuhnya kompatibel dengan situs Web mobile untuk memberikan komentar saat bepergian. Tema default mobile diformat dengan smartphone, seperti iPhone atau ponsel Android, dalam pikiran. 
Integrasi sosial 
Integrasi penuh dengan Facebook, Twitter, dan banyak lagi. Mari masuk orang, komentar, dan berbagi menggunakan layanan sosial yang mereka sudah menggunakan dan cinta. 
Kotak Komunitas 
Sebuah cara cepat untuk memamerkan apa yang komunitas Anda terdiri dari. Kotak komunitas memberikan semua orang melihat ringkasan aktivitas dan orang-orang yang berpartisipasi di situs. 
Menyukai dan berbagi 
Orang-orang dapat menilai apa yang mereka suka dengan halaman menyukai atau komentar dan kemudian berbagi yang di Facebook, Twitter, dan jaringan lain. 
Moderasi alat 
Kuat dan mudah-ke-menggunakan alat membantu Anda menjaga komunitas Anda di bawah kontrol. Panel moderasi dirancang untuk mengelola volume besar komentar yang masuk. 
Spam-Be-Lewatlah 
Di-rumah kami teknologi anti-spam membuat orang spam dan buruk keluar dari komunitas Anda. Kami anti-spam terus belajar dari sisa jaringan Disqus untuk menjaga situs Anda aman. 
Aplikasi ponsel 
Disqus aplikasi tersedia untuk iPhone, Android, dan telepon WebOS. Mengelola komunitas Anda saat Anda bepergian dengan aplikasi ini tersedia secara bebas. 
Blacklist dan Whitelist 
Membuat moderasi setiap hari lebih mudah dengan kontrol granular siapa yang akan mendapatkan untuk berkontribusi dalam masyarakat. Disqus memberi Anda alat kuat seperti blacklist, Whitelist, dan penyaringan kata. 
Impor dan ekspor 
Impor komentar yang ada ke Disqus dan sinkronisasi data Anda. Semua data benar-benar portabel dan dapat diekspor setiap saat. 
Bahasa internasional 
Disqus mendukung puluhan bahasa di samping bahasa Inggris. Menyelesaikan integrasi dengan dukungan bahasa asli. 
SEO-friendly dan sinkronisasi lokal 
Kami menawarkan plugin dan metode integrasi yang memastikan kompatibilitas dengan mesin pencari. 
Kustomisasi tema 
Sesuaikan dengan CSS untuk kelancaran keluar integrasi dengan situs web Anda. Atau, menggunakan editor tema kami yang canggih untuk kerajinan tema kustom Anda sendiri. 
Tweets dan reaksi 
Disqus membawa pembicaraan kembali ke situs Anda dengan mengumpulkan Tweets, menyebutkan, dan reaksi lainnya dari seluruh web. 
Profil manajemen 
Commenters kontrol personas mereka dan reputasi di komunitas yang berbeda mereka berpartisipasi pada. Disqus membuatnya mudah untuk melacak dan menjaga percakapan bersama. 
Kegiatan stream 
Audiens tetap terlibat dengan wawasan aktivitas orang lain di seluruh web. Aliran kegiatan terpadu membiarkan orang melihat mana lagi orang-orang yang pintar berbicara. 
communities
Disqus mencapai 200 juta orang setiap bulan di setengah juta website dan komunitas di web. Jaga percakapan hidup dengan menghubungkan audiens Anda dengan jutaan orang lain sudah pada Disqus. 
Sebelum mengikuti lihat instruksi yang diberikan di bawah ini, 

(A) Masuk ke Akun Blogger Anda. 
(B) Backup template blogger
(C) Pastikan bahwa blog Anda menggunakan Blogger Layouts. Lihat instruksi jika tidak meng-upgrade. 
(D) Aktifkan komentar. Lihat instruksi untuk mengaktifkan komentar. Pastikan bahwa Siapa yang Bisa Komentar? diatur toAnyone. 

Sekarang Ikuti langkah-langkah yang diberikan di bawah ini. Anda dapat menambahkan sistem komentar Disqus ke blog Anda dengan mudah. 
1. Pertama kali membuat account di Disqus.com. 
2. Sekarang kunjungi link ini untuk menambahkan blog Anda ke rekening Disqus: 


3. Isi rincian yang diperlukan dan klik "Lanjutkan". 


Nah Ini Sebenarnya Bisa di Pakai Untuk Beberapa Flatform Jika anda menggunakan Blog blogger Pilih Blog

setelah itu Pilih addsite setelahnya masuk ke blog anda dan tambah widget OKKK selesai


selesai sudah "cara mengganti komentar dengan disQus" Gampangkan hehehe 
trims komen yua""""""